Thursday 31 January 2013

Getting my Water Marble on.

Hi guys.

So today I went back to one of my favourite styles of Nail Art. The water marble. A lot of people seem to dread this one, but I adore it.
I can never seem to avoid air bubbles, but as they say, practise makes perfect.


I'm sure there are tidier ways of doing this, but although I try, I still seem to make a mess.

For this design, I used three Sally Hansons: Fairy Teal, Yellow Kitty, & Lavender Cloud. It's the first time I've used this brand in Water Marbling, I usually use Barry M, but these spread like a dream.


Not the prettiest in-bowl design I've done, but it's so much fun. I will say, if you haven't tried this, don't use a bowl that you love. I use one of our breakfast bowls, as I didn't realise it would be useless to use for anything other than playing.

A lot of people say it works at room temperature. I don't really follow this rule. I put 3/4 warm water from the tap, & top up with cold water. I then put a white base coat on, & tape up my fingers. By the time that is done & my base is dry, I go right ahead & it always seems to work.

The clean up after isn't much fun, & I don't know about anyone else, but whilst I have been converted to Sally Hansen, I find it stains my cuticles & surrounding skin, despite using acetone & warm soapy water. My fingers have started looking bruised from when I painted them two days ago. If anyone has any advice on how to make my skin lovely & pink again, I'd appreciate it.

I have another idea I want to play with that I saw on another blog, So there shall be a post on that eventually.

So until then...

Catch You Laters

x


Wednesday 30 January 2013

Miaow!


Hello, again!

This is something I've been wanting to try for ages, but nothing was going by way. There is a story behind this, I am a crazy cat lady. I love cats, owning two myself.
If you haven't please check out Kitten Cam. John is a kitty foster Dad. He takes in Mums & their new borns, & live streams the first eight weeks of their lives. He works as a volunteer at Purrfect Pals, which is an organisation in America.
The cam started as a way he could keep an eye on the kittens & Mum whilst he was at work etc, but it went viral.
It is such a good thing he does, & it is amazing watching the kittens grow up & be able to share their journey & I desperately wanted to do some nail art.

There are five kittens in the current group of fosters, & I got a bit over my head with this, I tried the kittens I thought would be the easiest, but that didn't work, so ended up doing one of my favourites, the lovely Parker:

Photo taken by John, used with his permission.

One of Parkers many escape attempts. I haven't done him justice in anyway, but a tabby was never going to be easy. 


Sadly poor Parker has ended up looking more like a dog, but it took ages, & I wasn't about to start again. 

If you'd like to see more photos, or get more information about the kitten cam, check out The Critter Room on Facebook. 

Catch you laters

x

Thunder Bolts & lightening, very, very frightening...

Hi everyone!

I've wanted to try this manicure since I discovered http://nailside.blogspot.co.uk/ (Who everyone should go and follow. Like, Seriously, go now!

She is an amazing artist, & I am indeed jealous of her skills. She is also lovely enough to do tutorials, which is what I used to do her lightning nails. (Tutorial here)


I am SO annoyed with myself. I've been working so hard to try & make my manicures tidy, & these were so nearly there. I tried cleaning, & it STAINED my skin! I used acetone, and warm water, but was so worried about ruining the design, I've thought sod it, so please just excuse the mess.

Of course, nowhere near as good as the tutorial. My lines aren't precise enough, & my accent finger went so wrong after making my boyfriend a cup of tea, that instead of starting again I just covered up with the purple.

As you can see, I'm sticking to Sally Hansen, & I used Fairy Teal & Anenome of Mine. The top coat was part of a cheapy set from Sainsburys. It is pretty amazing though!

I will definitely try this one again, as well as the other Tutorials. Housework is done, so I have the afternoon to try out different designs. Yay!

Catch you Laters

x

Monday 28 January 2013

Challenge 5 - Stripes Part 2

Aaaand, she's back! So has I stated in last post, I wasn't happy with my attempt, and can I state for the record... I HATE STRIPES.

I've had another go after receiving some striping tape of the gorgeous Saz, & Jesus, isn't that stuff fiddly! I think even the cat was laughing at me!

So, using tape, here is another attempt:


It's not great, & it is my first attempt at using striping tape. As you can see in the second photo, I used Sally Hansons complete salon manicure in 460 - Thinking of Blue & 420 - Yellow Kitty. Both of which I got from Poundland after seeing a blog post from Sammy - The Nailasaurus (Although if you're a nail art fan, you already follow her, as she is just amazing!)
I'd seen the products in Poundland before, but didn't bother as Polishes I'd brought from there had been baaaad. Sammy convinced me, & wow! I now have a new favourite brand, & for only a QUID! They're one coat only & go on like a dream. I'm really trying to improve on my overall finish, as I'm the tidiest person in the world, & these help so much. So GO, GO, GO! Off to Pound land with you!

& of course, as I'm obsessed with my Rimmel Matte, I had to topcoat with my baby:


I'm still amazed at the huge different it makes to a manicure. I freaking love it.

I am really am trying hard to get a perfect finish, & whilst I'm not there, I really think I'm improving, so again, thanks for your tips.

If you want to follow our challenge, I really recommend you check out:

Bobs Nails
Sazs nails
Little Hippie Girls Nails

They're pretty amazing!

Catch you laters

x

Saturday 26 January 2013

Challenge 5 - Stripes

Back for the next instalment in the challenge a few friends & I came up with. This week it's all about the stripes.

I think I'm going to try something else in the week, when I get the striping tape the very awesome Saz sent me, but for now I have two, not great attempts. 

First one is the Rainbow stripes. This took AGES! Never again. The most disappointing thing was I did it all free hand, so it looks even crappier. 


I would tell you what I used, but I used so many different polishes, it would take ages to type them all down. With the thumb, I used tape, but I wasn't too impressed, & couldn't cut the strips down thin enough, so the rest I did free hand. I finished it with my matte top coat, just because I'm so in love, & can see myself using it a lot.
Needless to say, as soon as I took the photo, I cleaned it all off. I think this could look amazing, but it took so long, I can't see my attempting it again.

The next attempt was something quick & easy,  but this was done at about four in the morning, so looking at it the next day it was a bit of a shock how messy it was.


I used Sally Hansen 'Thinking of Blue'as the base coat, & Rios white nail art pen. The only one I really like Is my little finger, so again I've taken this one off.

I have a few ideas of what I want to play with next, & as I can't seem to sleep, I'm going to have a go at a few designs tonight. 

Catch you laters

x

Thursday 24 January 2013

Taste The Rainbow...Matte Style!

Hi all,

I've contradicted myself this evening. I said I don't do plain nails, but that is exactly what I've done tonight on the lovely Megan. However I have plans for them tomorrow, so they wont be plain for long.

I love pastel colours, they are by far my favourite shade to play with. I had good reason to go plain. I treated myself to a Matte top coat.
Matte nails are gorgeous, & after the lovely Saz did a post about Rimmels top coat, I had to have the same.

I couldn't decide on just one colour, so thought What The Hell & went for different ones. I always do a white base coat, as I find it brings out the colours that much more.


(Excuse the state of the bottles, I make A LOT of mess when water Marbling)

Thankyou for all your tips on the tidy up process. It really helped a lot. Will take a lot of practise, but I'll get there.
As you can see, the finish on these are quite glossy, which I admit it lovely, but I really did want to see how the top coat made them look like.

The result:


It's stunning! I love it so much. It crazy how one top coat can change the appearance so drastically. Having this have pretty much DOUBLED my nail polish collection, which all us girls know is never a bad thing.

I got the top coat in Boots for around £4.60. Worth every single penny. Rimmel have really outdone themselves. The brush is HUGE & the application is so easy it  makes you think it must be too good to be true. Currently, I have nothing but good things to say about it. Hopefully it will be long lasting, & wont go gloopy really quick, as that would be disappointing, yet at this price, can't complain too much.

I will do another post tomorrow night hopefully, to show you how I'm planning on prettying this guys up!

Catch you Laters

x

Tuesday 22 January 2013

I'm Blue Da Ba Dee Da Ba Die...

Good Morning!

I ended up in bed all day yesterday, which seems to have done me a bit of good, as the Kay!Flu (As it is medically known) is feeling a bit better. Unfortunately, it also means I am pretty much nocturnal right now. Not much to do during they night, so yay for Nail Art.

I just want to point out, I cheat. My nails have never been strong. I've tried for years to get them in a decent condition, even refraining from painting them for a couple of years. I've tried every trick in the book, & nothing has worked. So now I wear UV gel extensions. I know, not going to be helping my nails at all. I love longer nails though, I have tiny hands, which also mean tiny, yet chubby fingers. Longer nails make my whole hand look much prettier. I do my own extensions, but I've only been learning since just after Christmas, so as you can see from photos, my nails don't always look 'normal' I've also got some growth, which I need to fix. hopefully it's not too noticeable.

I went into New Look Monday, & they had some polishes on sale. To be honest, I was expecting much from it. It was quite pretty, but it was only a pound, which don't always mean good quality. I do love being surprised though.

I wanted to play with my Konad set again, & came up with this:


As I've said in a previous post, even if I'm not happy, I'll post a photo anyway. I'm still learning, so what better way to see how I improve than to have photographic proof. I love the base coat, it's so pretty & only took two coats. 

I've obviously still got a lot to learn when it comes to stamping. I definitely need to work on my placement, & not worry too much about it drying too quickly. I also have to make sure I scape all excess off the plate, otherwise, as you can see on my ring finger, it will go on the stamp, & then go onto the nail. Very annoying. Still, it is such a quick and easy way to jazz up your design. 

Everyone needs to get a kit, even if it is just a starter kit.

I do have a question for fellow bloggers. Clean ups. I see so many blogs where the clean up is beautiful. I currently use Pure acetone & a cotton bud, but I don't seem to be very successful. If anyone has any advice, I would appreciate it a lot. 

I have my next post lined up, this whole blizzard thing England has going on is keeping me in the house, but giving me plenty of time to play with my nails.

Catch you laters.

x


Monday 21 January 2013

Konad Stamping!

One of the first things I discovered when I first got into Nail Art, looking at blogs, Konad was a big thing. I was desperate to get my hands on a kit, but due to not having pennies, I wasn't able to play.

For Christmas, my Boyfriends Brother got me an Amazon voucher, and after a month of umm'ing & aww'ing, I went for a starter kit.

I was literally like a little girl when it came, it's so diddy & pretty:


It also came with some Rhinestones, however I was a little disappointed that they didn't come in their own tub it's loose in the plastic with a sticker covers so as to stop them escaping, so they're not in the following photo:


It's so shiny & pretty. The nail varnishes that came with it are the tiniest bottles I have ever seen, but to be honest, paying around the £8 mark, I wasn't expecting a lot. Luckily, you aren't limited to only using Konad Polishes. 

I still have my Orange Butterfly nails on from yesterday, & really didn't want to remove them just yet. I still wanted to play, so my friend, Megan stepped up to the challenge of being my model. 

It's so much easier than I thought it would be. It took a couple of attempts to get the stamper to pick up the design, but that was just trial & error. Once I figured out to roll the stamper on the plate there was no trouble.

Megan decided on a purple base & we went for gold for the print. Sticking with my Butterfly theme I have going, we went for a little one, these are the results:


Please excuse the lack of tidying up. I had a go, but I'm a lot sicker than yesterday, & my lungs were having none of it, so Megan took over on the clean up. Lovely girl,  but blind as a bat. It is a New Years Resolution of mine to make sure I do a proper clean up, but I'm hoping you forgive me this once. 

I love the little design, it's so delicate & yummy. The Barry M Gold foil worked beautifully. I'm not particularly keen on the base coat, but it's not me that has to wear them, so I cant really complain about that too much. (Still can't help focusing on the mess around the nail!)

I can't wait to experiment more, & have plenty of ideas, but not enough hands to play with, so it will be periodically.

I was also very naughty, & got myself a Matte top coat. Seriously, so many ideas. Looking forwad to sharing them with you.

Catch you laters!

x


Sunday 20 January 2013

Challenge 4 - Orange Nails

How is it time for the next challenge already?!

I'm currently feeling so poorly. I've managed to escape every lurgy going this Winter, but some germy gits have got me. I can never get just a simple cold, it always has to go straight to my chest. I have asthma & Scarring on my lungs, so if it gets to them, I really suffer. I currently feel like I have a rice crispy in my right lung, a lot of snap, crackle & popping.
The reason I shared this with you, is so you can understand why this challenge has been the hardest yet. Nail Varnish fumes are a killer. As are the fumes from Acetone. Lots of coughing, but once I have an idea, I have to go with it, so I soldiered on.

I had a completely different idea at the beginning of the week, using rhinestones. I then googled & cam up with this instead, using tips from lots of different photos & mashing them together.
Like I've previously said, I'm not a fan of plain manicures, so here is my attempt at Orange:


Sadly, like my Mother pointed out, they don't look very Orange!In natural light, I promise you it's orange, with a bit of yellow. I haven't cheated!

I love Butterfly nail art, & have wanted to try it for a while, but never got the inspiration, & ignoring the bad lighting, I'm quite proud of these. Yay!

I didn't take photos of the steps I took, but I did manage to take a photo of everything I used.


Even in this photo, my Orange doesn't look very Orange. How annoying.

Can't wait to see what the other girls have come up with!

I will be doing a mid-week post, as my new Konad Stamping kit arrived. So I'll do a review on that.

Catch ya laters.

x

Wednesday 16 January 2013

Galaxy Drip

Check me out doing another post.

Like lots of people, I've fallen in love with Galaxy nails, especially the Galaxy drip effect. It's so prettyyyy.
I thought I'd give it a go. I didn't really know where to start though, so Google became my friend. There are so many different ways people seem to do it, so I sort of winged it.

I've  been feeling a little under the weather, so I set aside a couple of hours this afternoon to have a play, this is what I ended up with:

For a first attempt I don't think it's too bad. I'm still learning how to use all my new toys, so I'm sure if I try it out in a few months it will be so much better. That's the plan anyway.

Galaxy nails are always fun. I tend to make a bit of a mess, & have bits of sponge lying about, but I find it so much easier than Gradient. With Galaxy, I don't think you can go wrong as such (Totally ignoring my forefinger haha)

If you have a go at this, put me to shame and post your own photos.

Catch you laters.

Monday 14 January 2013

Challenge 3 - Polka Dots!

Hi Guys.
I know I promised a blog post at the weekend, so I'm a little late (oops!) Real life got in the way. I was planning on doing this earlier, but I had to go watch my baby (he's 19!) Brother play football. It tried snowing, & I got excited. Whilst his team lost, it was funny listening to the other teams goal keeper getting shitty because he let another goal in!

However, to make up for it, I did three, yes THREE different attempts. I really need to get a job. I have way too much time on my hands!

Attempt One:

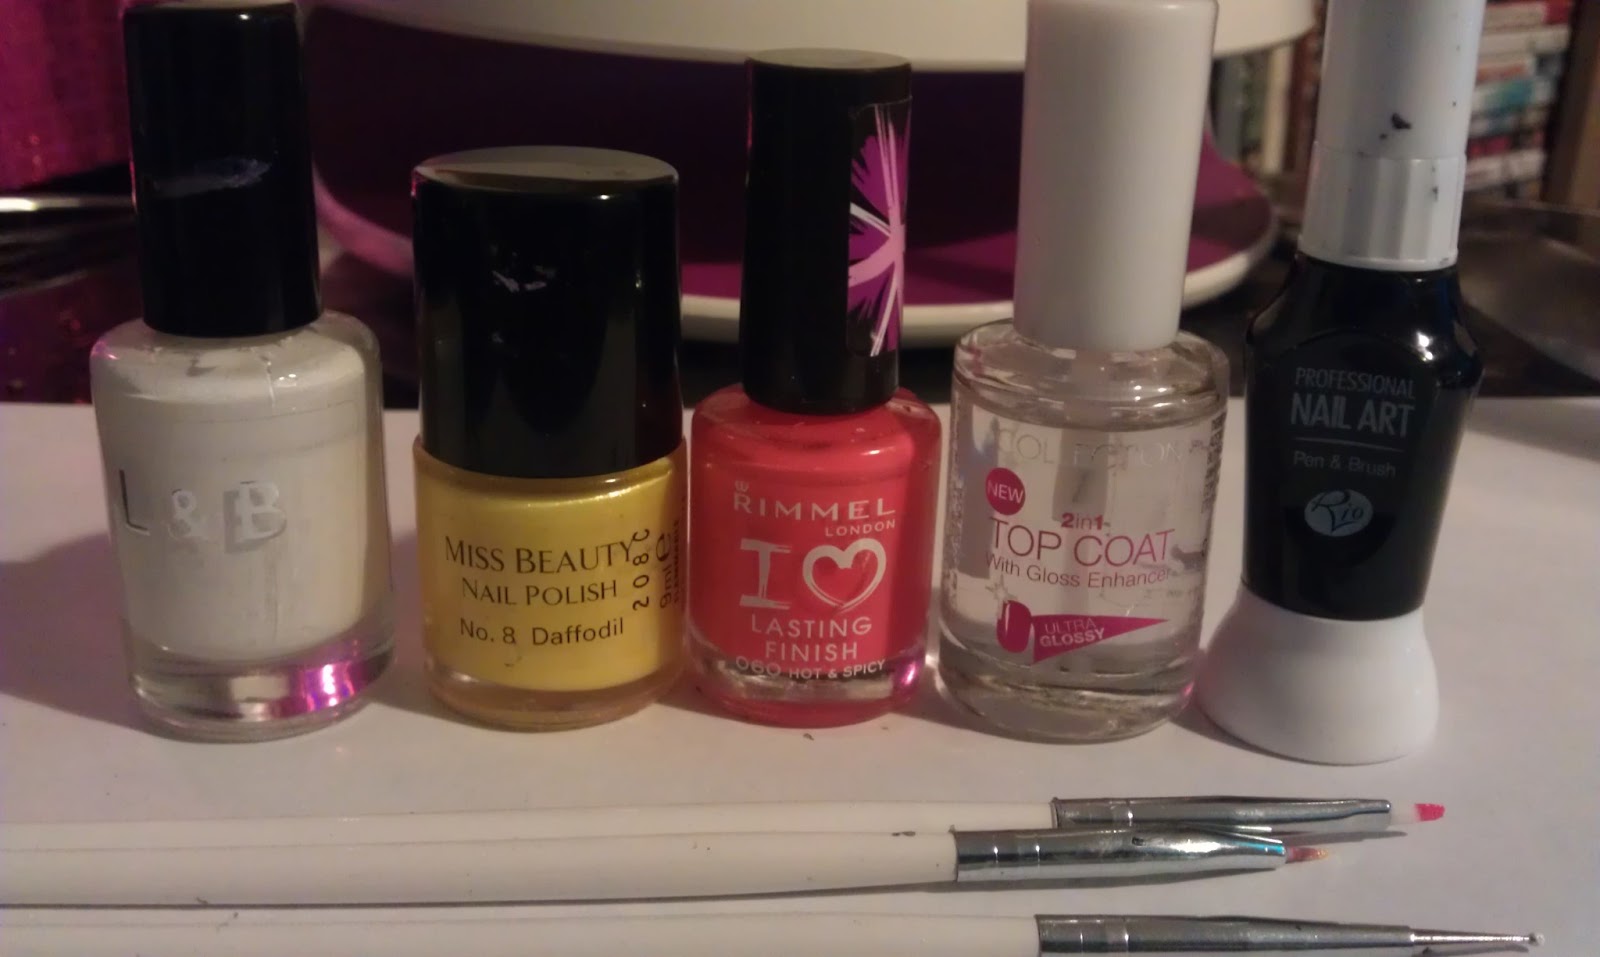
I don't know what you guys thought of the Xmas sales, but in my area, they were terrible. The best I found was, surprisingly Sainsburys, about a week after. All their Christmassy things were 70% off. This included nail-y goodness! I've never heard of LB brand before. I got a manicure set for £1.50 & a foil kit for £2.25. Turns out they are actually a really good brand. The varnishes I've tested dry very quickly, & after coats you've got a beautiful nail.

I'll admit now, I've never been a huge fan of foils. It almost seems like cheating, but I actually quite liked them. They're very easy to put on, however for something simple like this, I think I'd rather do it by hand.

I roped the lovely Megan into letting me play with her nails, & this was the end result:


They really are quite eye-catching. I did them after eating a huge kebab, so was feeling all bloated & sick, so was probably a lot easier to do than my attempt. One downside though, the bits you cut off, I just put them on the desk. Turns out, it's near impossible to get back off once it's stuck to glass. Bad times.

Like I said, I think I'd only use foils that had a very intricate design, not something like this.

Attempt Two:

I'm going to use this section to gush about my lovely boyfriend. We've been together nearly five years I think. (Please tell me I'm not the only one who doesn't have an anniversary date? It happened over time, there was no one defining moment when we decided we were together) He has early onset Osteoarthritis & is currently waiting for a hip replacement. He's in pain constantly, but never takes it out on me, which is quite common in these situations. He really takes an interest in my new hobbies. We have a silent agreement, I pay attention when he talks about his shooty PS3 games, & he pays attention when I go "ooh pretties"

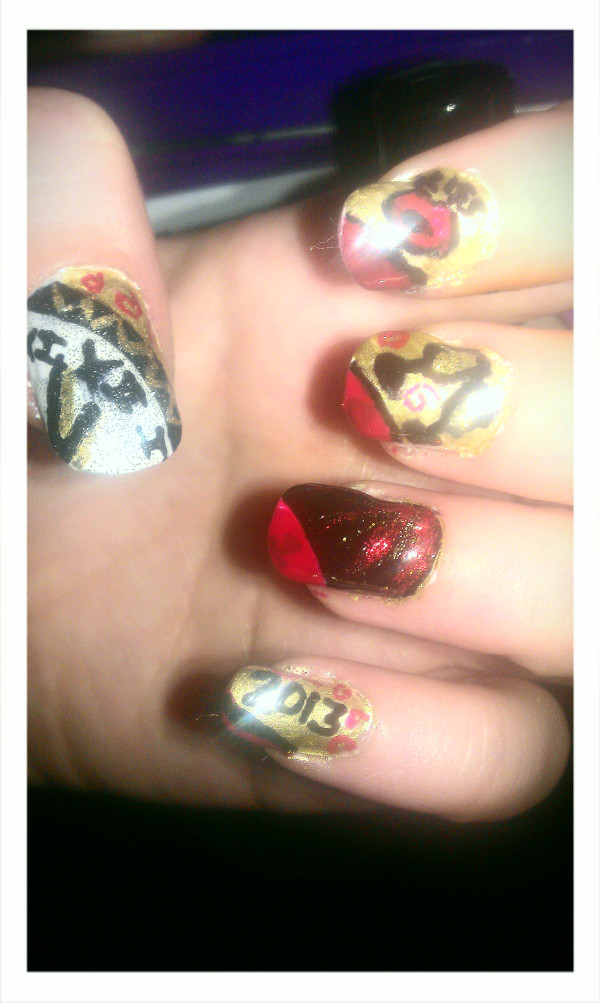
I told him about this weeks challenge, & he wanted me to try this out. Everyone loves Ladybirds (Ladybugs if you're weird :-P ) This really didn't take long at all, as you can probably see, plus the design was attempted on my right hand, which never ends up pretty. 


I was an idiot & forgot to put the pupils in, poor, blind Ladybirds. I used LBs brand, which I mentioned above, for the red. The Black & white I used Rios nail art pens. I'm a big fan of Rio. They're affordable & they give you so much flexibility with your designs. My only fault with them, is they take too long to dry, & after a couple of hours they're usually ruined if you were in a rush. I think if you leave it half hour before putting a top coat on, then it is fine, but I didn't have the time with these. I love the idea behind it, so will definitely come back to this design when I have a bit more time, & hopefully improve it a lot. 

Still, I promised I'd post photos of attempts I'm not so proud of, so here you go.

Attempt 3:

Riiight, this one. This is the one I spoke about in the previous blog. I found a picture a few months ago of a Polka dot design. I remember it was stunning. I remember it looked impossible to do. I don't remember where I found it.

This is purely from memory. I don't think it's anything like the gorgeous art I found, but unless I had it in front of me, I don't think I would have been able to achieve it anyway.

Tada:


So yes, nothing like I wanted, but it still has Polka dots! At the moment I'm having to use my HTC Desire HD for a camera (which is rubbish FYI) So I don't know why some parts look dirty. It isn't in natural light.

I hit a bit of a stumbling block in way of my dotting tool. I only have one, but it's very small, & I wanted bigger dots. I used  my brains though, & used the ends of two nail art brushes though. I think the dots are slightly too big, but better than being too small.

If I ever find that bloody picture again, I will attempt it properly, as it was just beautiful.

You will be getting another blog post this week hopefully, as I have an idea of something I want to try, although I have no idea if I'll manage it. We shall see.

So, Until next time...

x


Friday 11 January 2013

Painting the town Pink & Black.

I've had itchy fingers! I've really wanted to do a blog post that wasn't entirely to do with the year challenge.

So what does any self respecting twenty five year old girl do on a Friday evening? She puts on her jim jams & paints her nails of course.

To tell the truth, I actually started last night, but nothing was going right. I'd figured out a design whilst washing up, I even drew it on a piece of paper, but would it go right? Bollocks would it. I had a little play around this afternoon, & still nothing was working. I googled, I nearly growled at friends putting up photos of their newly painted nails, wondering why I couldn't figure anything out. This of course led to a grown woman having a bit of a tantrum of sulking.

I don't know about anyone else, but when I have a sulk, I do everything a bit half arsed. A friend has left all her nail polishes at mine, as I do her nails for her anyway, so I was just playing around with her Christmas ones, and I discovered the most beautiful pink. I now know how Columbus must have felt.

I'm a big fan of pink & black, and since getting into nail art, I find a plain manicure a bit boring, so there will always be two colours.
Ten minutes later, I ended up with this:


Granted it's not great,  like I said, it only took me ten minutes. Isn't it the most beautiful shade of pink you've ever seen? 
If I had pennies, I know the perfect outfit I would wear with these nails, were I to go out. However, I shall not solely depend on cleavage power to ensure I'd actually get a drink.

These will of course be coming off this weekend, & I shall be posting my nail challenge! Exciting. I've already done one, as I had two different ideas. The one I'm going to attempt tomorrow, will most likely end with me in tears, as I've lost the photo I had, so will be trying to do it from memory. Trust me when I tell you I couldn't work out how it was done when I had the bloody pic in front of me, let alone from memory.

I promise, that regardless how big a cock up I make, I'll post a pic. I always feel a little downhearted at seeing perfect nail blogs. I'm still learning, & want to know that even amazing artists go wrong a few times. 

Catch you at the weekend.x


Monday 7 January 2013

Challenge 2: Red Nails!

I was not looking forward to this challenge. I'm not too much of a fan of simplistic designs. I have the imagination of a child, so I get so many ideas, & having one colour restricts me.

I was lucky really. I put UV gel extensions on a friend at the weekend, & as she was poorly, she just wanted a simple design on them. We came up with this:


I figured I could adapt this to my red challenge & my brain went into overdrive at the possibilities. I love French Manicures, especially when they're unique. I think they can look gorgeous & glamorous.
Of course, at the other end of the scale, they can look quite trashy & cheap, which sadly, I think I achieved. My bad!


I am planning on redoing the this week. I wont be adding the red glitter this time, as it completely ruined it. I think the red rhinestone was pointless, although it is much more clear in person. I'm not sure I will even use rhinestones next time.

Ahh, all the possibilities.

Challenge 1 - New Years Eve Nails

The first challenge was using the prompt New Years Eve. I was very spoilt at Christmas so had lots of new Nail Art toys to play with, including new pens & brushes. Before I had got along with using cocktail sticks, (which are amazing little tools to use when you don't have the proper set.)

I ended up doing two designs, as the first I wasn't happy with. It went completely wrong, & it was nearing midnight so I couldn't start again. I'll share with you, as you can see the direction I was planning to go with my idea:

You can see how I wanted to have the 2013 on each nail, but I'd used the wrong brush, & in complete laziness, just tried painting over it in red. It didn't work & I lost my temper & went to bed.
It's a huge learning  curve trying to figure out what brush is best for what design, I'm slowly getting there though.

The Second design I was a lot more happier with. I made sure I had plenty of time & completed one nail at a time. Technically, I did this after New Years, but that's the beauty of having a week to do a challenge. You can go a completely different direction half way through, & end up with something you're a bit more proud of.

I maybe should have tried cleaning it up a bit before the photo sesh, but I will admit I'm rubbish at that. I end up taking half the design off, so tend to wait til I have my bath the next morning, where it comes off beautifully.
I really had the chance to play with my different brushes & pens. Whilst it's not to an amazing standard, I really was proud of this one.

I really enjoyed looking at the other girls designs, it's amazing how we all have different interpretations, & how our nails end up.

The Pilot

Hello!

Every American TV show I've ever watched has had their first episode named 'The Pilot' So I figured, what the hell, Why can't my first ever blog post go with the same format!

I've been bombarding my my poor Twitter followers with photos of my Nail Art. Whilst some may enjoy it, I'm not sure everyone feels the same. A couple of friends have started Blogs so again with the 'Figured, What the Hell' (Which seems to be a growing philosophy in my life.)

I'm part of a year long nail art challenge, & want to keep it all together. Most Bloggers follow the 31 day challenges, but I'm not a fan. I'm pretty much a perfectionist, & will spend a while on each design. It's pretty heartbreaking cleaning a design your proud of every 24 hours, So myself & a few awesome girls have created the year long challenge. Taking ideas from a few different challenges popular online, the idea is to do a challenge every weekend.

I'm not going to lie, I'm crazy excited for this. I care for my disabled boyfriend, & needed something to do for me, that I could do at home & is cheap & cheerful. I fell into Nail Art by accident, but like all great romances, it was love at first sight, with a little bit of angst along the way. (angst = me losing my temper when it goes wrong)

I'm hoping over the next year my skills will have improved tenfold, & I'll have photos to see them grow.

So Welcome to my Blog

PS: Go check out these blogs: Saz' Blog! & Bobs Blog They will be doing the same Blog as myself, & they're AMAZING!